The cellpy templating system#
Often the steps you have to go through when analysing your cells are a bit repetetive. To help facilitate a smoother workflow, cellpy provides a templating system using cookiecutter in the background. The publicly available templates are located in a repository on github (jepegit/cellpy_cookies).
How to start a session and set-up a project using a template#
In a command window / shell in the python or conda environment where cellpy is installed, write:
> cellpy new
cellpy will then list all the directories (“projects”) in your project directory (typically called “out”) and you must choose one of them (write one of the numbers, or go for the default):
Template: standard
Select project folder:
1 - [create new dir]
2 - Internal
3 - SuperBatteries
4 - AmazingCell
5 - MoZEES
6 - SIMBA
7 - LongLife
8 - MoreIsLess
9 - MoZEES
Choose from 1, 2, 3, 4, 5, 6, 7, 8, 9 [1]:
If you press enter without writing a number, it will select the default, whatever is written in the square brackets. The projects listed will be different for you than it is here. If this is the first time using cellpy, most likely only the option 1 exists.
For example, if we would like to look at some cells belonging the the MoreIsLess project, we write 8 and press Enter. Next cellpy needs you to confirm that the project name is correct (shown in square brackets) by pressing Enter again. If you want to change the name, you can also give it here.
Choose from 1, 2, 3, 4, 5, 6, 7, 8, 9 [1]: 8 ⏎
project_name [MoreIsLess]:
However, in this example we will chose to create a new directory (“project”) by selecting the default (by just pressing enter).
Choose from 1, 2, 3, 4, 5, 6, 7, 8, 9 [1]: ⏎
New name [cellpy_project]:
Write my_project and press Enter. Confirm the project name by pressing Enter once more:
New name [cellpy_project]: my_project ⏎
created my_project
project_name [my_project]: ⏎
Next we need to provide a session id (for example the batch name used in your db). Here we chose to call it experiment_001:
session_id: experiment_001 ⏎
cellpy then asks you to confirm the version of cellpy you are using (not all templates works with all versions), author name (your user name most likely), and date. Accept all by pressing Enter for each item.
cellpy_version [1.0.0a]: ⏎
author_name [jepe]: ⏎
date [2023-01-18]: ⏎
Next cellpy will suggest a name for the directory / folder that the template will create, as well as the “core” name of the notebook(s) (or script). Once again, confirm the by pressing Enter:
experiment_folder_name [2023_01_18_experiment_001]: ⏎
notebook_name [experiment_001]: ⏎
Under the hood, cellpy uses cookiecutter to download and create the structure from the template:
   Cellpy Cookie says: 'using cookie from the cellpy_cookies repository'
   Cellpy Cookie says: 'setting up project in the following directory: C:\cellpy_data\notebooks\my_project\2023_01_18_experiment_001'
created:
2023_01_18_experiment_001/
    00_experiment_001_notes_home.ipynb
    01_experiment_001_loader.ipynb
    02_experiment_001_life.ipynb
    03_experiment_001_cycles.ipynb
    04_experiment_001_ica.ipynb
    05_experiment_001_plots.ipynb
    data/
        external/
        interim/
        processed/
        raw/
    out/
        note.md
Congratulations - you have succesfully created a directory structure and several jupyter notebooks you can use for processing your cell data!
Run the notebooks#
Start jupyter (either jupyter notebook or jupyterlab). If you want, there exists a cellpy command for this as well. The benefit is that it starts up the jupyter server in the correct directory. Obviously, this will not work if you dont have jupyter properly installed.
In a command window / shell in the python or conda environment where cellpy is installed, write:
> cellpy serve -l ⏎
The -l option means that you want to run jupyterlab. You can also tell cellpy to automatically start jupyter after it has finished populating stuff from the template by issuing the -s option when you run the new sub-command.
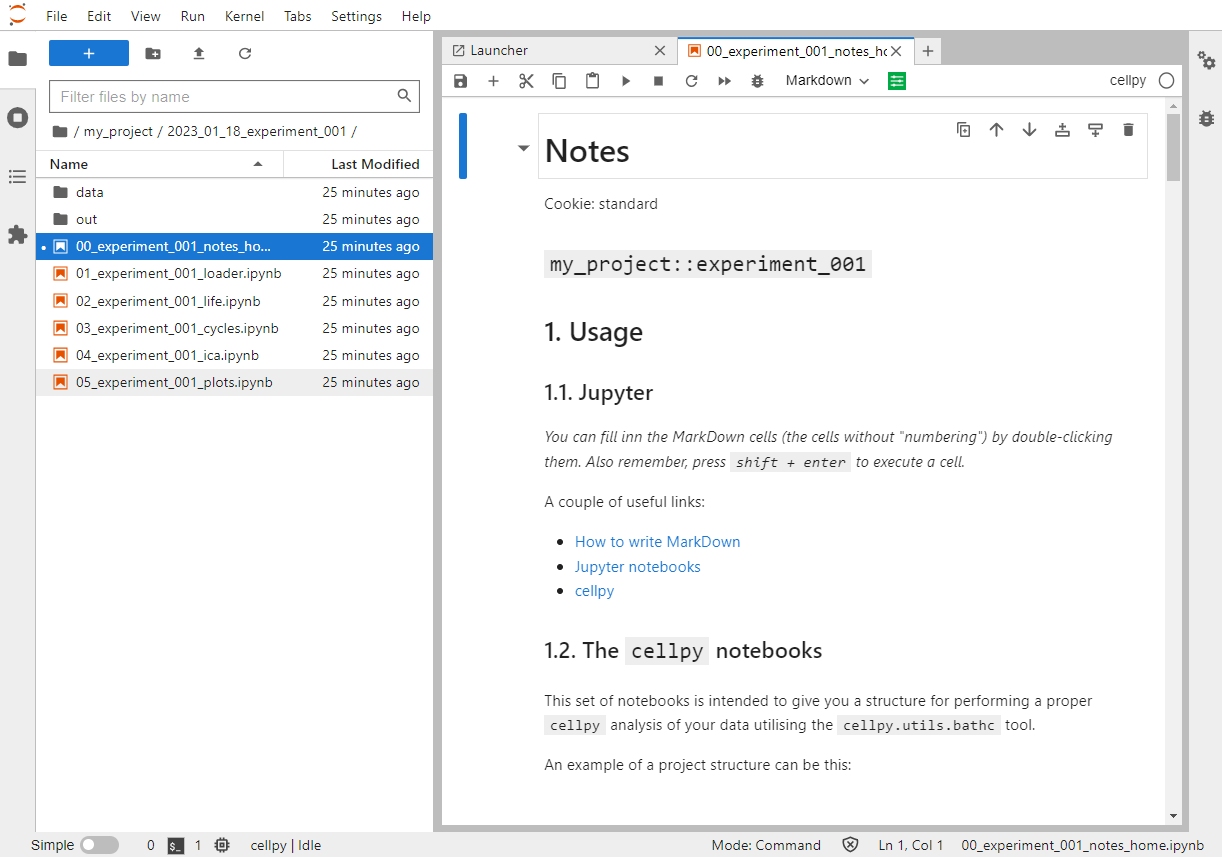
Hopefully you will see something like this:
More in-depth on the templating system#
Get some help:
> cellpy new --help  ⏎


Usage: cellpy new [OPTIONS]

  Set up a batch experiment (might need git installed).

Options:
  -t, --template TEXT        Provide template name.
  -d, --directory TEXT       Create in custom directory.
  -p, --project TEXT         Provide project name (i.e. sub-directory name).
  -e, --experiment TEXT      Provide experiment name (i.e. lookup-value).
  -u, --local-user-template  Use local template from the templates directory.
  -s, --serve                Run Jupyter.
  -r, --run                  Use PaperMill to run the notebook(s) from the
                             template (will only work properly if the
                             notebooks can be sorted in correct run-order by
                             'sorted'.
  -j, --lab                  Use Jupyter Lab instead of Notebook when serving.
  -l, --list                 List available templates and exit.
  --help                     Show this message and exit.
Assume you have the following inside your templates folder (cellpy_data:nbsphinx-math:templates):
> ls  ⏎
cellpy_cookie_advanced.zip  cellpy_cookie_easy.zip  cellpy_cookie_pytorch.zip  just_a_regular_zipped_folder.zip
You can list the available templates using the --list option:
> cellpy new --list

[cellpy] batch templates
[cellpy] - default: standard
[cellpy] - registered templates (on github):
                standard           ('https://github.com/jepegit/cellpy_cookies.git', 'standard')
                ife                ('https://github.com/jepegit/cellpy_cookies.git', 'ife')
[cellpy] - local templates (C:\cellpy_data\templates):
                advanced           ('C:\\cellpy_data\\templates\\cellpy_cookie_advanced.zip', None)
                easy               ('C:\\cellpy_data\\templates\\cellpy_cookie_easy.zip', None)
                pytorch            ('C:\\cellpy_data\\templates\\cellpy_cookie_pytorch.zip', None)
Your local templates needs to adhere to the following structure:
it must be in a zipped file (.zip)
the zip-file needs to start with “cellpy_cookie” and contain one top level folder with the same name
the top folder can not contain several templates
you need a cookiecutter configuration file (you can copy-paste from the github repository to get a starting point for editing)
you will also need the “hooks” folder with the “post_gen_project.py” and the “pre_gen_project.py” files (copy-paste them from the github repository and modify if needed)
cookiecuttervariables are enclosed in double curly brackets
Here is an example (content of the zip file “cellpy_cookie_standard.zip”):
└───cellpy_cookie_standard
     │   cookiecutter.json
     │
     ├───hooks
     │       post_gen_project.py
     │       pre_gen_project.py
     │
     └───{{cookiecutter.experiment_folder_name}}
         │   00_{{cookiecutter.notebook_name}}_notes.ipynb
         │   01_{{cookiecutter.notebook_name}}_loader.ipynb
         │   02_{{cookiecutter.notebook_name}}_life.ipynb
         │   03_{{cookiecutter.notebook_name}}_cycles.ipynb
         │   04_{{cookiecutter.notebook_name}}_ica.ipynb
         │   05_{{cookiecutter.notebook_name}}_plots.ipynb
         │
         ├───data
         │   ├───external
         │   │
         │   ├───interim
         │   │
         │   ├───processed
         │   │
         │   └───raw
         │
         └───out
                 note.md
Example template#
You can find an example template in the cellpy examples folder on GitHub
https://github.com/jepegit/cellpy/tree/master/examples/cellpy%20project%20template
Hint#
To download a folder from GitHub, navigate to your desired repository, select the folder you want to download from GitHub, copy the URL, navigate to GitHub Downloader and paste the URL into the text box, and hit enter .
Note#
For the temlates located on GitHub (non-local) an additional folder level is added.